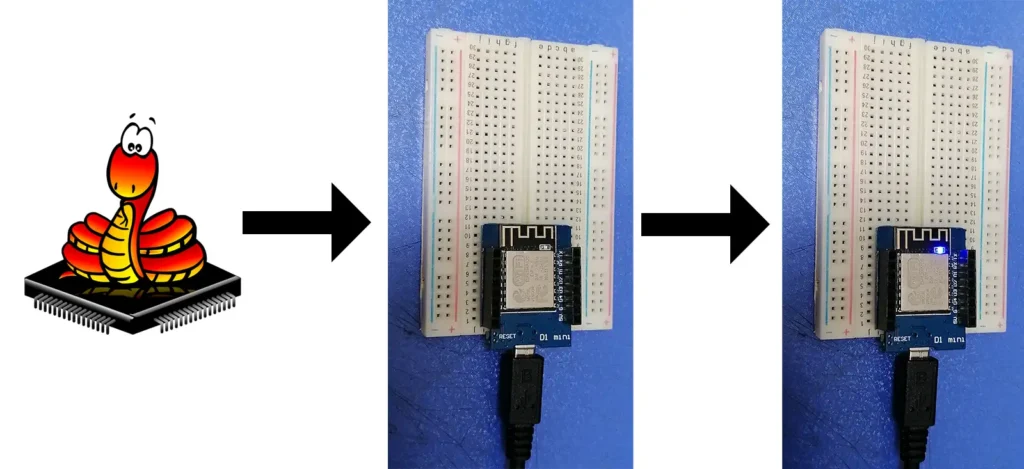
-
💻 How to Install Thonny IDE for MicroPython
Step-by-step guide to download and set up Thonny IDE for MicroPython development on ESP8266.
-
🧱 How to Flash MicroPython Firmware to ESP8266
Learn how to install MicroPython on your ESP8266 using Thonny IDE for easy programming.
-
💡 ESP8266 LED Blink Example with MicroPython
Write a simple LED blink program to test your ESP8266, firmware, and Thonny IDE setup.
-
⚠️ ESP8266 Shows Weird Symbols After Firmware Flash? Here’s the Fix
If your ESP8266 displays scrambled or garbled characters, unreadable text or symbols after flashing MicroPython, this guide explains the cause and solution.
There are various types of ESP8266 development boards available in the market. To upload and debug MicroPython programs on an ESP8266 chip, your computer needs to communicate with the board. This is typically done through a USB-to-Serial converter.
The most common USB-to-Serial chips used with ESP8266 boards are CH340G and CP210x (like CP2102). Some boards—such as NodeMCU and Wemos D1 Mini—have these converter chips built-in, making them easy to connect via USB. However, many ESP8266 modules (like bare ESP-12E or ESP-07) do not include a USB-to-Serial interface, requiring an external USB-to-Serial adapter and some jumper wires for connection.
To communicate properly, your computer may need the correct drivers for the USB-to-Serial chip. You can find and download the CH340G and CP2102 drivers for Windows, along with a step-by-step manual installation tutorial, at https://microdiypro.com/install-ch340g-cp2102-usb-to-serial-drivers/
💻 How to Install Thonny IDE for MicroPython on Windows
If you’re getting started with MicroPython and ESP8266/ESP32 development, Thonny IDE is one of the easiest and most beginner-friendly tools to use. In this tutorial, you’ll learn how to install Thonny IDE, set it up for MicroPython, and connect it to your ESP board.
✅ What Is Thonny IDE? Thonny is a simple Python IDE designed for beginners. It’s lightweight, easy to install, and works perfectly with MicroPython boards such as the ESP8266 and ESP32. With built-in REPL support and file management, it makes programming microcontrollers easy and efficient. Installing Thonny for MicroPython is a simple task you can easily do.
🔽 Step 1: Download and Install Thonny IDE Go to the official Thonny website: 👉 https://thonny.org
* Download the installer for your operating system:
For this tutorial we use windows version of Thonny.
Install Thonny:
After downloading double-click the .exe file and follow the installation steps.
⚙️ Step 2: Set Up Thonny for MicroPython
Once Thonny is installed, let’s configure it to communicate with your ESP board. Launch Thonny IDE.
Go to Tools > Options and open the Interpreter tab.
In the dropdown, select: MicroPython (ESP8266) or MicroPython (ESP32) depending on your board. Plug in your board using a USB cable. Select the correct Port (e.g., COM3 on Windows). Click OK.
🧱 How to Flash MicroPython Firmware to ESP8266
There is a YouTube video for this tutorial that you can watch by clicking the link below:
▶️ Getting Started with MicroPython on ESP8266 & ESP32 | No Experience Needed!
To start, we need a Python library named ESPTOOL, which works as an interface between Windows and USB-connected devices like the ESP8266 and ESP32. First, check if ESPTOOL is installed by running:
esptool versionIf it returns the version of esptool (you might see a different version), it means ESPTOOL is installed:
esptool.py v4.8.1
4.8.1
If you get an error like this, ESPTOOL is not installed, or Python itself is missing or misconfigured:
'esptool' is not recognized as an internal or external command,
operable program or batch file.
To check Python installation, run:
python --versionIf the output is ‘Python was not found’, follow this step-by-step guide:
- 👉 How to Install Python for ESP8266 and ESP32 – Full Guide on microDIYpro.com
- ▶️ Watch on YouTube: How to Install Python for ESP8266 and ESP32
If Python is installed, proceed with installing ESPTOOL:
pip install esptoolIf you see “‘pip’ is not recognized as an internal or external command”, check this guide to install or upgrade pip:
- 👉 Install/Upgrade pip – Guide on microDIYpro.com
- ▶️ Watch on YouTube: How to Install Python for ESP8266 and ESP32
When ESPTOOL installs successfully, you will see output similar to this:
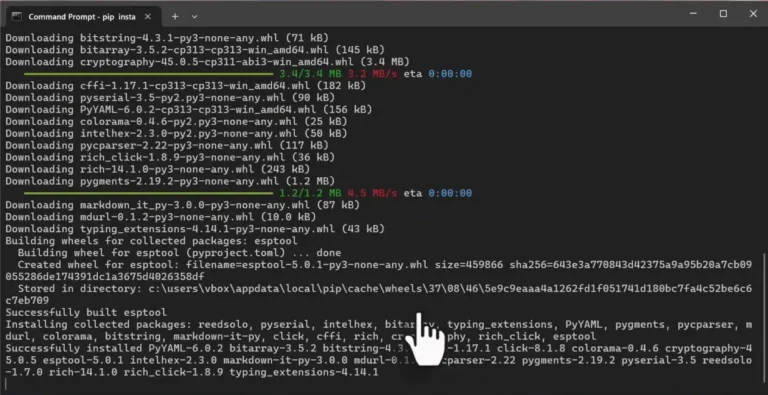
Again for checking the installation status we use “esptool version” command like below:

To upgrade esptool, run the following command in your terminal or command prompt:
pip install --upgrade esptool
To start communication with your ESP8266 or ESP32, you need to have the USB to Serial Converter driver installed on your computer. You can follow our detailed step-by-step guide in this USB to Serial driver installation tutorial on microDIYpro.com.
In this step we can connect our ESP devkit and start communication with it through assigned COM port. We have two options for deploying MicroPython firmware to the board:
- By Thonny IDE(Graphical interface and begginers-frienly) or.
- By using esptool from command line(for professional users).
For both of these we need to download the proper Micropython firmware file according to our ESP board. we can search on goolge for “ESP8266 micropython firmware” or simply go to its website : https://micropython.org .
Using Thonny IDE
A graphical interface that is beginner-friendly for deploying MicroPython firmware to your ESP8266 or ESP32.
-
- Open Thonny IDE
- Go to “Tools -> Options” menu
- In the opened windows select Interpreter tab
- At the bottom of the window above OK & Cancel buttons click on “Install or update MicroPython (esptool)”
- At the bottom of opened window left to Install button there is a small button with three line symbol. Click on it to open the menu and click on “Select local MicroPython image” to choose the downloaded micropython firmware
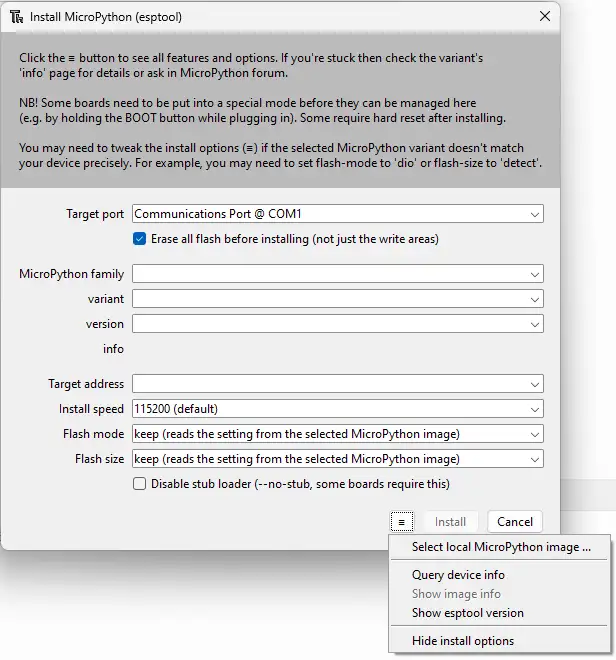
- After selecting the image file almost every filed will be filled automatically according to the selected file. Then We just need to select Target port which is the COM port we know from device manager that is related to the USb to Serial converter driver.
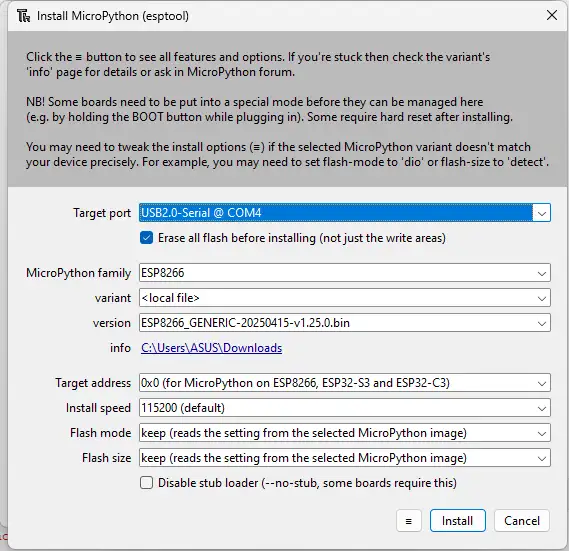
- Now we are almost done and just need to push Install button and wait until installation process is done. after that by closing opened windows and going to Thonny IDE main page we can check the installation.
- At right bottom corner of Thonny IDE we can select our ESP8266 board with its COM port.
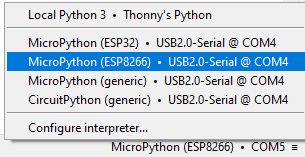
- After selecting the appropriate board.
- Push red STOP button at the top menu.
- If everything goes correctly we will see something like below in the shell window
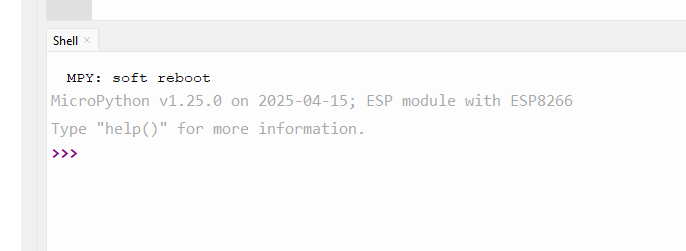
This shows that we hopefully could finish the process with success and we see that MicroPython V1.25.0 is deployed to our ESP8266.
Using esptool
A command-line tool recommended for advanced users to flash MicroPython firmware onto the board.
The command for this is as below. But there are some consideration that we need to prepare before starting the process.
esptool --port COM4 --chip esp8266 --baud 460800 write-flash --flash-mode dio --flash-size detect --erase-all 0x0 C:\Users\User\Downloads\ESP8266_GENERIC-20250415-v1.25.0.bin- We need to know the path to the firmware file.
- We need to know the Com port number.
- We must consider the baud rate because 460800 may not work.
- This command is according to my computer situation and you must change it for your computer.
- To be easier to change the command if it was not working we should prepare complete command in a text file and paste the command into the command line.
After using esptool for deploying MicroPython firmware to the ESP8266 you can check it with Thonny IDE as I explained above this section.
💡 ESP8266 LED Blink Example with MicroPython
Now that you have MicroPython running on your ESP8266 (Wemos D1 Mini), let’s create the classic Blink example. This will toggle the on-board LED using Thonny IDE. In this step, we just want to test our ESP8266 board to make sure everything is working correctly before moving on to more complex programs. For now, we’ll simply turn on the built-in LED with the simplest MicroPython code example.
Steps
- Connect your ESP8266 board (Wemos D1 Mini) to your computer via USB.
- Open Thonny IDE and select the MicroPython (ESP8266) interpreter from the bottom-right corner.
- Create a new file (File → New).
- Paste the code below and save it to the device as
main.py(or any filename ending with.py).
main.py directly in the device’s memory.
from machine import Pin

# On Wemos D1 Mini, the built-in LED is connected to GPIO2 (D4)
Pin(2, Pin.OUT).off()
When you run this code, the blue LED on your Wemos D1 Mini will turn on and stay lit. Don’t worry if you don’t fully understand the code yet — we’ll explain it line by line later. For now, just observe the output.
Once you’ve confirmed the LED can be turned on, we can go further and create the LED Blink program as shown below:
from machine import Pin
from time import sleep

# On Wemos D1 Mini, the built-in LED is connected to GPIO2 (D4)
led = Pin(2, Pin.OUT)

while True:
    led.value(0)   # Turn LED ON (active low)
    sleep(1)
    led.value(1)   # Turn LED OFF
    sleep(1)
When you run this code, the blue LED on your Wemos D1 Mini will blink on and off every second.
sleep(1) values to control the blinking speed. For example, use sleep(0.2) for about 5 blinks per second.
⚠️ ESP8266 Shows Weird Symbols After Firmware Flash? Here’s the Fix
Sometimes after flashing ESP8266 or ESP32 with MicroPython firmware we get errors or we get scrambled or unreadable characters in Thonny IDE after connecting the board USB to our computer. There are some reasons that we can check:
- The USB cable is weak or broken. the power for board is not provided properly or data connection has problem
- Firmware flashing has not been done properly
- Flashing configuration was not true(which I will explain later)
- Rarely the flash chip may be faulty or broken
Some boards have different flash size so we need to put Flash size on detect and Flash mode on “dio”. This will resolve the problem.
If there is any question or problem with your boards related to this tutorial I will be happy to answer you in the comments.

